
Here is what you need to do to add fonts in Cricut Design Space. This is the simplest and quickest guide to follow on the internet on this matter. It doesn’t matter your level of experience and know-how, you can easily follow this guide.

Cricut is an American brand of cutting plotters, or computer-controlled cutting machines, designed for home crafters. The machines are used for cutting paper, felt, vinyl, fabric and other materials such as leather, matboard, and wood.
They have on sale 3 types of cutters:
– Joy
– Maker 3
– Explore 3
The devices are super simple to use, and the results that you get with these smart machines are incredible.
In plus, Cricut offers you Design Space – a powerful software that they made for all the Cricut smart cutting machines.
The software is very nice to use and simple, but it has only 15 fonts in the free version. Their paid subscriptions offer you 700 fonts to choose from but even so, you might want to use a certain font that you like most.
Find below how you can add all the fonts you like in Cricut.
Here is what you need to do to add fonts in Cricut Design SpaceCricut uses installed fonts. So, you have to install all the fonts you like on your system first.
Install fonts on Windows OSTo install fonts on Windows, follow these simple steps:
– Unpack the zip folder that you downloaded.
– Go to the folder with the fonts and search for the .OTF or .TTF file (best is to install the OTF file if possible).
– Double-click on the font as if you are opening an application.
– Now the font installation window will open.
– Click Install and wait a few seconds.
– Repeat this step for all the fonts you want to get installed.
Install fonts on macOSTo install fonts on a Mac, follow the following steps:
– Make sure to unpack the zipped folder.
– Go to the folder with the fonts and double click on either the OTF or TTF font file (we always recommend the OTF file).
– After you double click a window will open with a preview of the font and a small button at the bottom saying “Install”.
– Click install.
– Make sure to restart your application (and if that doesn’t work restart your computer).
Using the newly installed fonts on Cricut Design SpaceAfter you installed all the fonts you like on your Windows or Mac computer, restart Cricut Design Space. This way you will be sure that the new fonts will appear in the fonts list.
But first you need to do something.
When you add text and hit the fonts dropdown, you have to select System Fonts. This way, you will have access to all the fonts you installed. It will take your computer a couple of seconds to load your system fonts.
This is a simple trick.
Fonts that many Cricut users love for their projects
These are 3 fonts that Cricut users love:
1. Dearest John
2. Chipboard


There are tons of fonts that will make wonders in your Cricut projects, just take your time to find them.
ConclusionsCricut revolutionized the industry by offering very simple to use, smart, creative, and affordable cutting machines.
And in plus, they offered a special software – Cricut Design Space. A software that is highly intuitive, complete, and simple to use.
No matter what you try to achieve with Cricut, it is possible, just practice.
In plus, using this simple guide, you will have access to all the fonts you like.

I'm a programmer at heart. But in my 20s, I realized there was more to the world of fonts than just Courier.
Driven by endless curiosity, I built a system to explore them.
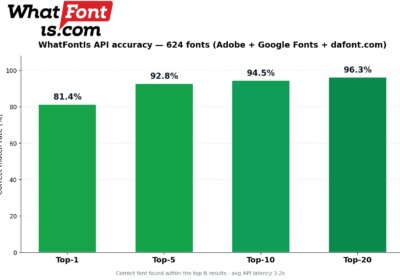
That project grew into one of the world’s leading font identifier platforms: www.WhatFontIs.com.
By 2024, WhatFontIs is helping nearly one million designers—famous or not—discover the names of the fonts they need.